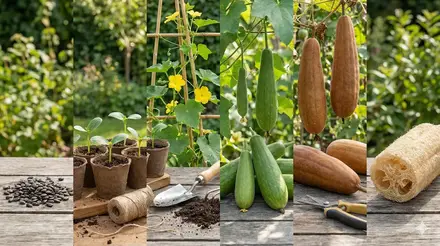
There's something deeply satisfying about growing your own loofah sponges. That scratchy, fibrous texture you feel in the shower? It came from a plant—a vigorous, tropical vine that you can grow in your own backyard.
I remember the first time I held a loofah I'd grown myself. After months of watching the vine climb my fence, dodging pest problems, and nervously waiting for the gourds to dry—I finally peeled back the papery skin to reveal that beautiful golden fiber network inside. It felt like unwrapping a gift from nature.
But here's what most growing guides won't tell you upfront: loofah is a commitment. These plants need 150-200 frost-free days, which means if you live anywhere north of zone 8, you'll need to start seeds indoors and use every season-extending trick in the book. The good news? Thousands of gardeners in "too cold" climates successfully grow loofah every year. You just need to understand what you're getting into.
This guide walks you through every step—from cracking open that first stubborn seed to peeling your finished sponge. Whether you're dreaming of replacing plastic sponges in your kitchen or creating handmade gifts for everyone you know, you'll find everything you need right here.
Wait, Loofah Comes from a Plant?
If you've only ever seen loofahs hanging in bathroom stores, this might blow your mind: loofah (also spelled luffa or loofa) is actually a gourd. It's a member of the cucumber family, closely related to squash, melons, and—yes—cucumbers.
When you let a loofah gourd fully mature on the vine, something magical happens. The flesh inside breaks down completely, leaving behind only the vascular structure of the fruit—that dense, interconnected fiber network we use as sponges. It's like the plant builds its own scrub brush.
There are two main species you'll encounter:
- Luffa aegyptiaca (smooth loofah) — The most common variety for sponge production. Produces cylindrical fruits 12-24 inches long with smooth skin. This is what you want if your goal is bath and kitchen sponges.
- Luffa acutangula (ridged loofah) — Features distinctive ridges running the length of the fruit. More commonly grown as a vegetable in South and Southeast Asia, though it makes usable sponges too.
For this guide, we'll focus primarily on smooth loofah (Luffa aegyptiaca), since that's what most people are trying to grow when they search for loofah seeds.
Can You Actually Grow Loofah Where You Live?
This is the question that stops most people before they start. Loofah is a tropical plant native to South Asia, which makes northern gardeners understandably nervous. But the reality is more encouraging than you might expect.
The honest answer: If you can grow butternut squash, you can probably grow loofah. Both need similar conditions—a long warm season, full sun, and patience.
| Your Zone | Can You Grow Loofah? | Strategy |
|---|---|---|
| Zones 9-10 | Easy | Direct sow outdoors after last frost. Long season means reliable harvests. |
| Zone 8 | Good | Start indoors 4 weeks early. Most years produce mature sponges without trouble. |
| Zone 7 | Moderate | Start indoors 6 weeks early. Choose early-maturing varieties. May need season extension. |
| Zone 6 | Challenging | Start indoors 6-8 weeks early. Use black plastic mulch, wall o' waters, or row covers. Grow against south-facing wall. |
| Zone 5 and below | Difficult | Requires aggressive season extension (greenhouse, high tunnel, or indoor finishing). Some gardeners succeed, but expect challenges. |
Don't know your growing zone? Check our zone-specific planting guide for detailed timing in your area.
What You Need Before You Start
Before you order seeds and start dreaming about your loofah harvest, let's make sure you have what these plants need. Missing any of these requirements is the #1 reason loofah projects fail.
Loofah vines are sun worshippers. They need at least 6 hours of direct sunlight, but 8+ hours is ideal. Partial shade leads to weak vines, poor flowering, and immature fruit. If your sunniest spot only gets 5-6 hours, it's worth trying—but manage your expectations.
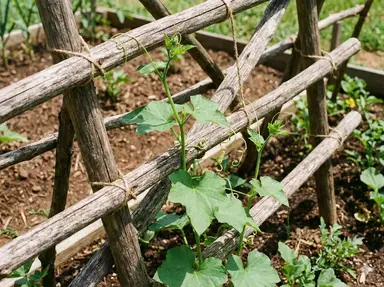
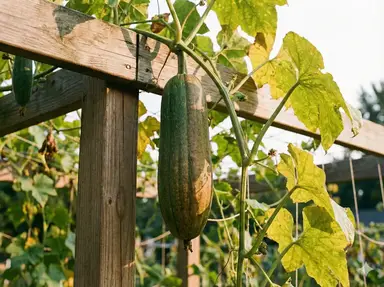
These vines get BIG—15-30 feet long in good conditions. They need something strong to climb: a tall fence, pergola, sturdy trellis, or cattle panel arch. Whatever you build, make sure it can handle the weight of heavy, water-filled gourds hanging from it.
From transplanting to harvest, loofah needs roughly 90-120 days of warm weather—plus additional time for drying on the vine. Add in germination time, and you're looking at 5-7 months from seed to sponge. Count backward from your first fall frost to see if you have enough time.
Loofah are heavy feeders. They want nutrient-rich soil that drains well but holds moisture. Before planting, work in 3-4 inches of compost. If your soil is heavy clay, consider raised beds. Sandy soil works but needs more frequent watering and feeding.
Starting Loofah Seeds (The Tricky Part)
If there's one stage where loofah growing projects fail, it's germination. Loofah seeds have a notoriously hard outer coating that can prevent water from reaching the embryo inside. Many first-time growers plant seeds, wait... and wait... and eventually give up, assuming the seeds were bad.
They probably weren't bad. They just needed help waking up.
When to Start Seeds
Count backward from your last frost date:
- Zones 8-10: Start seeds 4 weeks before last frost (or direct sow after frost)
- Zone 7: Start seeds 6 weeks before last frost
- Zones 5-6: Start seeds 6-8 weeks before last frost
Don't start too early! Loofah seedlings grow fast and get root-bound quickly. You want transplant-ready seedlings, not overgrown, stressed plants.
Breaking Seed Dormancy
To dramatically improve germination rates, you need to help water penetrate that hard seed coat. Here are two proven methods:
Place seeds in a cup of warm (not hot) water for 24-48 hours. Change the water once if it cools completely. Seeds should swell slightly—this indicates water is getting through. Plant immediately after soaking.
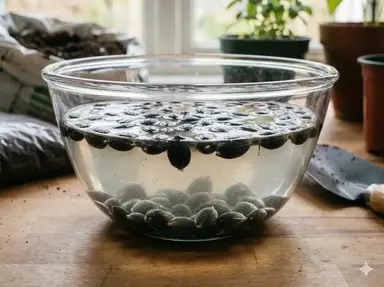
Use a nail file, sandpaper, or nail clippers to carefully nick or sand through the outer seed coat on the rounded end (opposite the pointed tip). You want to expose the lighter inner layer without damaging the seed. Then soak for 12-24 hours before planting.
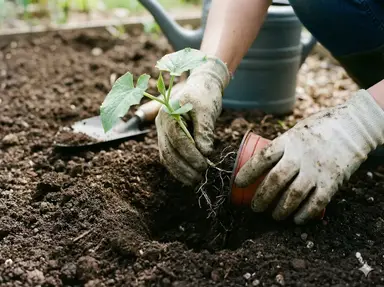
Planting Seeds
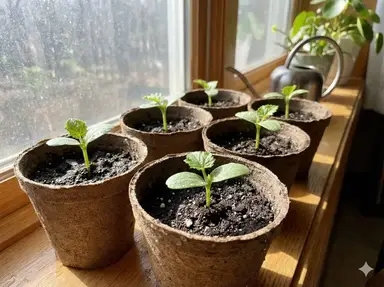
- Use individual pots: Loofah hates root disturbance. Plant in 3-4 inch pots or biodegradable peat pots you can plant directly in the ground later.
- Fill with seed starting mix: Regular potting soil is too heavy. Use a light, sterile seed starting mix.
- Plant 1 inch deep: Push the seed in pointed end down, cover, and water thoroughly.
- Provide bottom heat: This is crucial. Loofah seeds need soil temperatures of 70-85°F to germinate. Use a seedling heat mat if your home is cool.
- Keep consistently moist: Cover pots with plastic wrap or a humidity dome until sprouts appear.
Expect germination in 7-14 days with proper preparation. Some seeds may take up to 3 weeks, so don't give up too soon.
KVITER Heirloom Luffa Seeds (40 Count)
Fast-sprouting non-GMO seeds with 90%+ germination rate. Perfect for beginners wanting reliable results.
Check Price on Amazon
BN-LINK Seedling Heat Mat
Cuts germination time in half with consistent 75-85°F warmth. Waterproof and durable for years of use.
Check Price on AmazonAs an Amazon Associate, we earn from qualifying purchases. See all our seed recommendations →
Transplanting Outdoors
Your seedlings have sprouted, developed their first true leaves, and are ready for the big move. This transition is critical—get it wrong, and you'll set your plants back weeks.
Timing the Transplant
Wait until:
- Nighttime temperatures are consistently above 55°F (ideally 60°F+)
- All danger of frost has passed
- Soil temperature is at least 65°F
- Seedlings have 2-3 true leaves
Loofah is extremely cold-sensitive. A single night below 50°F can stunt growth significantly. If in doubt, wait another week.
Hardening Off (Don't Skip This!)
Your pampered indoor seedlings have never felt wind, temperature swings, or intense direct sun. Transplanting them directly into the garden is a shock they may not survive.
Over 7-10 days, gradually introduce them to outdoor conditions:
- Days 1-2: Place outdoors in shade for 1-2 hours, bring inside
- Days 3-4: Increase to 3-4 hours, some morning sun
- Days 5-6: 5-6 hours, mostly sun
- Days 7-10: All day outside, including some overnight if temps are warm

Planting in the Ground
- Choose the sunniest spot: South-facing walls are ideal—they reflect heat and protect from wind.
- Prepare the soil: Dig a hole twice the width of the pot, work in compost.
- Plant at the same depth: Don't bury the stem deeper than it was in the pot.
- Water deeply: Soak the root zone thoroughly.
- Mulch around the base: 2-3 inches of straw or wood chips retains moisture and keeps roots cool.
- Install support immediately: Don't wait until vines are already sprawling.
Spacing: Plant loofah 3-4 feet apart if growing on a trellis (they'll share the vertical space). For ground sprawling (not recommended), space 6-8 feet apart.
Ongoing Care Throughout the Season
Once established, loofah vines are surprisingly resilient. But the difference between a struggling plant and one overflowing with gourds often comes down to consistent care during key growth stages.
Watering
Loofah needs consistent moisture, especially during flowering and fruit development. Aim for:
- 1-2 inches of water per week during active growth
- Water deeply but less frequently to encourage deep root development
- Water at the base, not on leaves to prevent fungal diseases
- Increase watering during heat waves—wilting leaves in morning = not enough water
In late season when gourds are drying on the vine, reduce watering. The drying process requires less moisture.
Feeding
Loofah are heavy feeders. Without adequate nutrition, you'll get lots of vine and few fruits.
- At planting: Work balanced compost into the soil
- Every 2-3 weeks: Side-dress with compost or apply balanced organic fertilizer (10-10-10 or similar)
- When flowering begins: Switch to lower-nitrogen fertilizer (5-10-10) to encourage fruiting over leaf growth
- Stop fertilizing once gourds are sizing up (about 6 weeks before expected frost)
Training on Supports
Loofah vines have tendrils that grab onto supports, but they're not as aggressive as some climbing plants. Help them along:
- Gently weave growing tips through trellis openings
- Use soft plant ties if vines need extra support
- Train main vines upward; allow side branches to fill in horizontally
- Check weekly and redirect wayward vines before they get too heavy
Loofah grown on vertical supports produces straighter gourds, better air circulation (less disease), and easier harvesting. It's worth the effort. Explore trellis options →
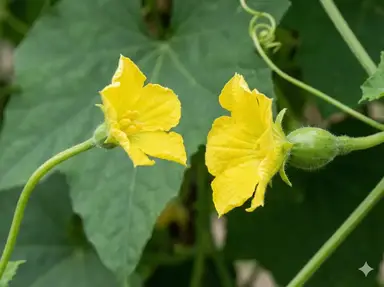
Pollination: Why Your Vine Has Flowers But No Fruit
This is the panic moment for many first-time loofah growers. The vine is huge, covered in beautiful yellow flowers, but... where are the gourds?
Here's what you need to know: loofah produces separate male and female flowers. Male flowers appear first (sometimes weeks before females) and their only job is producing pollen. They bloom, drop off, and never become fruit. This is normal.
Female flowers have a tiny miniature loofah shape at their base (the ovary). When pollinated, this swells into a full-sized gourd. Without pollination, it yellows and falls off.
How to Identify Flowers
| Characteristic | Male Flowers | Female Flowers |
|---|---|---|
| Base of flower | Thin stem only | Small gourd shape (ovary) |
| Center of flower | Stamens with pollen | Stigma (sticky surface) |
| When they appear | First, often 2-3 weeks earlier | Later in the season |
| After blooming | Drop off naturally | Develop into fruit (if pollinated) |
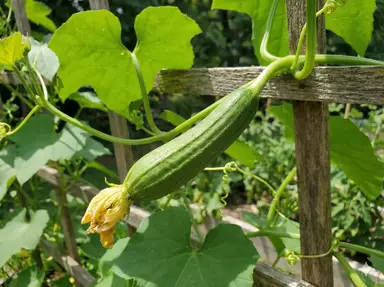
Hand Pollination (Insurance Against Poor Fruit Set)
If you're seeing female flowers but they're not developing into gourds, pollinators may not be doing their job. Hand pollination is easy:
- Identify a freshly-opened male flower (early morning is best)
- Pick it off and peel back the petals to expose the pollen-covered stamens
- Find an open female flower and gently brush the pollen onto the center stigma
- One male flower can pollinate 2-3 females
Alternatively, use a small paintbrush to transfer pollen between flowers. Troubleshoot pollination issues →
Common Problems (And How to Fix Them)
Even experienced gardeners run into issues with loofah. Here are the most common problems and what to do about them.
These pests love all cucurbits. Look for beetles early morning when they're sluggish. Hand-pick and drop in soapy water. For bad infestations, use neem oil or pyrethrin spray. Row covers early in the season prevent initial infestation.
Common in late summer when days are hot and nights are cool. Improve air circulation (vertical growing helps), water at base not on leaves, and spray weekly with diluted milk solution (40% milk, 60% water) as prevention. Remove badly affected leaves.
Early male-only flowers are normal (see pollination section above). If female flowers appear but don't set fruit, hand pollinate. If female flowers never appear, the plant may be too young, too shaded, or over-fertilized with nitrogen.
Older leaves yellowing near the base is normal as the plant ages. But widespread yellowing can indicate: overwatering (check soil drainage), underwatering (check if soil is dry), nutrient deficiency (feed with balanced fertilizer), or disease. Diagnose yellow leaves →
When and How to Harvest Loofah
This is the moment you've been waiting for—but patience is key. Harvest too early, and you get a gourd, not a sponge. Harvest at the right time, and peeling that fibrous goodness is one of the most satisfying moments in gardening.
Signs Your Loofah is Ready
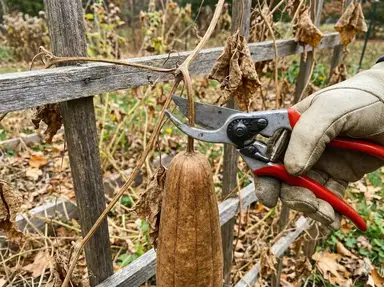
The ideal loofah for sponge-making is dried on the vine. Wait for these signs:
- Skin color changes: From green to yellow to brown
- Weight drops dramatically: It feels light and hollow, not heavy with moisture
- Skin is loose: Feels papery and separates easily from the fiber inside
- You hear seeds rattle: When you shake it, seeds move freely inside
- Stem is dry and brown: No longer green and juicy
What If Frost is Coming?
If frost threatens before your loofahs are fully dry, you have options:
- Harvest and finish indoors: Cut gourds with a few inches of stem attached. Hang in a dry, warm, well-ventilated area (garage, basement, shed) for 2-4 more weeks until fully dry.
- Cover plants: For light frost, covering with sheets or row cover can buy you another week or two.
- Accept some loss: Immature green gourds won't make usable sponges. Better to focus on saving the most developed ones.
Complete harvest timing guide →

Processing: From Gourd to Sponge
You have a dried loofah in your hands. Now let's turn it into a usable sponge.
Peeling and Cleaning
- Crack the skin: Press on the gourd to crack the brittle outer skin. It should break easily.
- Peel away the skin: Strip off all the papery brown outer layer. It comes off in sheets and strips.
- Shake out seeds: Once peeled, shake the loofah over a container to collect black seeds (save these for next year!).
- Remove remaining flesh: If any dried flesh remains attached to the fibers, soak in water for 10-15 minutes to soften, then scrub under running water.
- Rinse thoroughly: Run water through the sponge from all angles until the water runs clear.
- Optional bleaching: For a lighter color, soak in a solution of 1 part white vinegar to 9 parts water for 30 minutes. Or use diluted hydrogen peroxide. Natural bleaching methods →
- Dry completely: Set in direct sunlight or a well-ventilated area for 1-2 days. Must be completely dry before storage.
Cutting to Size
One whole loofah gourd can be cut into multiple sponges:
- Cross-sections: Cut 2-3 inch thick rounds for dish scrubbers or bath sponges
- Lengthwise: Slice in half for flat cleaning pads
- Leave whole: For back scrubbers or decorative use
A typical 12-18 inch loofah yields 6-8 kitchen-sized scrubbers. That's a year's supply from a single gourd! Detailed processing guide with photos →
Storing and Saving Seeds
Storing Finished Sponges
Dried, processed loofah sponges will last indefinitely in storage. The key is keeping them completely dry:
- Store in a breathable container (paper bag, cardboard box, or mesh bag)
- Keep in a dry location away from humidity
- Avoid plastic bags or sealed containers that trap moisture
- Properly stored sponges last 2-3+ years
Saving Seeds for Next Year
Those black seeds you shook out? Each one can become a new plant next year.
- Spread to dry: Lay seeds in a single layer on a paper towel for 1-2 weeks
- Test for dryness: Seeds should be hard and impossible to dent with your fingernail
- Store properly: Place in a paper envelope labeled with the date, then inside a sealed jar
- Keep cool and dark: Store in a cool, dark location. Refrigerator works well.
- Viability: Loofah seeds remain viable for 3-5 years with proper storage
Now That You Have Loofah Sponges...
Congratulations! You've successfully grown one of the most useful plants in the sustainable living toolkit. But what exactly can you do with all those sponges?
Use in the shower or bath for gentle exfoliation. Loofah removes dead skin cells, stimulates circulation, and leaves skin feeling smooth. Perfect for dry skin and keratosis pilaris.
Cut loofah makes excellent dish scrubbers that won't scratch most surfaces. Unlike plastic sponges, they're 100% biodegradable and won't shed microplastics. Compost when worn out.
Homegrown loofah makes thoughtful, eco-friendly gifts. Embed slices in homemade soap, create gift basket sets, or simply wrap a few rounds with a ribbon. Everyone needs sponges!
Frequently Asked Questions
A healthy loofah plant can produce 10-25 gourds per season, depending on growing conditions and length of season. Each gourd yields 6-8 sponges when cut. That's potentially 60-200 sponges from a single plant—more than most households can use in years!
Yes, but it requires a very large container (15-20 gallon minimum), a sturdy trellis, and diligent watering. Container-grown loofah typically produces fewer and smaller gourds. It's a good option for patios and balconies if ground planting isn't possible. Full container growing guide →
No! Sea sponges come from ocean animals. Loofah is entirely plant-based—it's a gourd grown on a vine. This makes loofah vegan, more sustainable, and something you can grow yourself. Learn the differences →
Not necessarily. Brown coloring can result from: harvesting too late (too much time drying on the vine), mold from drying in humid conditions, or exposure to rain after the skin cracked. Brown sponges are still functional, just less aesthetically pleasing. Try natural bleaching →